Create Your First Mod
What we are going to make
We will make a texture replacement mod that changes the PAYDAY 3 logos shown on the title screen and in the main menu. Once you Forge the mod and load the game, you can see your replacement artwork immediately without entering a heist.
We will replace these two textures:
PAYDAY3/Content/UI/Textures/Generic/SS_UI_PD3_Logo_02
PAYDAY3/Content/UI/Textures/Generic/Tex_Payday_3_Logo
The mod will be a PDML-compatible Unreal plugin created with CrimeForge. We will use MyFirstMod as its name throughout the tutorial.
By the end, you will have:
-
Created a Blank mod with CrimeForge.
-
Found both logo textures and converted them to editable uncooked assets.
-
Reimported your own images into those assets.
-
Added both replacements to the mod’s PAL so Forge includes them.
-
Forged and installed the mod, then checked the logos in PAYDAY 3.
Before you start
Complete Set Up the Project and Editor Tour. You should have the modkit open in the custom PAYDAY 3 editor, with CrimeForge available and the game path configured.
You also need:
-
The cooked PAYDAY 3 assets visible in the Content Browser. See Cooked Assets if they are missing.
-
Your replacement artwork saved as image files, such as PNGs. You can use the same image for both logos or prepare a different image for each.
-
PDML installed for the in-game test. See Install and Test for the runtime prerequisite.
Choose artwork that is easy to distinguish from the original logo. When preparing each image, use the original texture’s dimensions as a starting point and preserve transparency if you want the artwork to appear without a rectangular background.
Create a Blank CrimeForge mod
CrimeForge creates the Unreal plugin structure for your mod. A plugin is the container that gives the mod its own content root, metadata, and files to send through Forge. PDML discovers the forged plugin when the game starts.
The Blank template is a general-purpose starting point. It creates the plugin and standard CrimeForge assets, including PAL_<ModName> and DA_<ModName>. The PAL, or Primary Asset Label, tells CrimeForge which assets belong in the mod’s cook/package workflow. We will use it to include the two logo replacements.
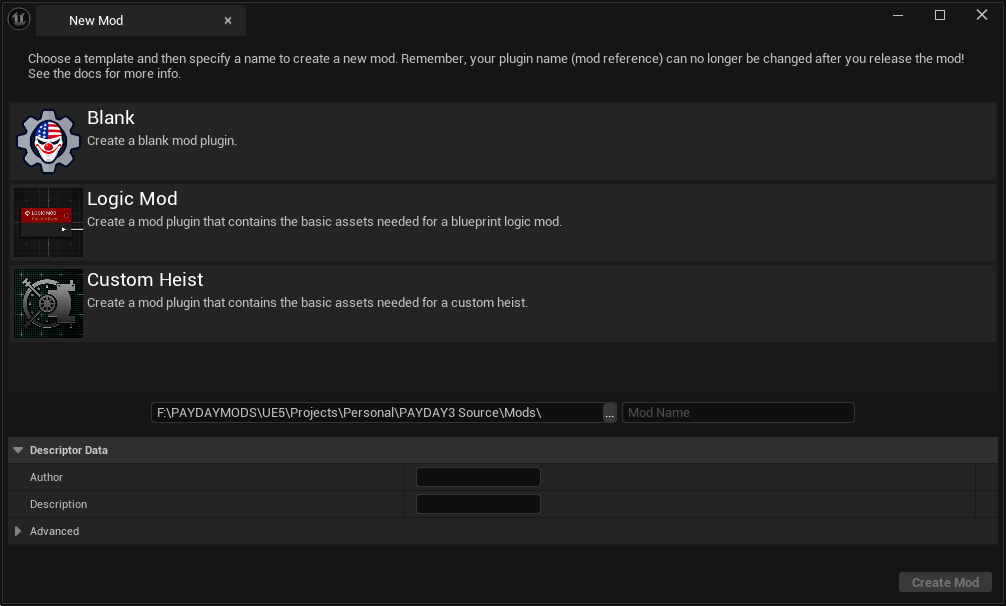
Choose the template and name
-
Select the Blank template.
-
Enter
MyFirstModin Mod Name. -
Fill in Author with your name and Description with a short description, such as
Replaces the title and main-menu logos with my own artwork. -
Use the normal development location,
<ModkitRoot>/Mods/, where CrimeForge creates mod plugins. -
Click Create Mod and let CrimeForge generate the plugin.
See Templates for the other starting templates and Create Mod for the full creation-window reference.
|
Keep the plugin name stable once you start creating referenced assets. The name becomes part of its mount point and asset paths; renaming it later can break references. |
Find the generated assets
-
Find
MyFirstModin the CrimeForge mod manager. -
Click the mod’s icon to open its content directory in the Content Browser.
-
Locate
PAL_MyFirstMod. You will open this asset after editing the textures.
Keep the files and structure generated by CrimeForge together. The PAL stays in the mod’s content directory, while the logo replacements will stay at their original game paths.
Find the two logo textures
In the editor, PAYDAY3/Content/ corresponds to the /Game/ content root. The two textures therefore have these package paths:
/Game/UI/Textures/Generic/SS_UI_PD3_Logo_02
/Game/UI/Textures/Generic/Tex_Payday_3_Logo-
Open the Content Browser and navigate to the game’s
UI/Textures/Genericfolder under/Game/. -
Search for
SS_UI_PD3_Logo_02and locate the texture. -
Open it to inspect the original logo and note its dimensions, then close the texture editor.
-
Locate
Tex_Payday_3_Logoin the same folder and inspect it too. Clear the previous search or change the search text to find the second texture.
The original cooked assets open in read-only mode. Convert them before trying to change their image data.
Convert the textures to uncooked assets
-
Right-click
SS_UI_PD3_Logo_02in the Content Browser and select Convert to Uncooked. -
Let the conversion finish.
-
Right-click
Tex_Payday_3_Logoand select Convert to Uncooked too.
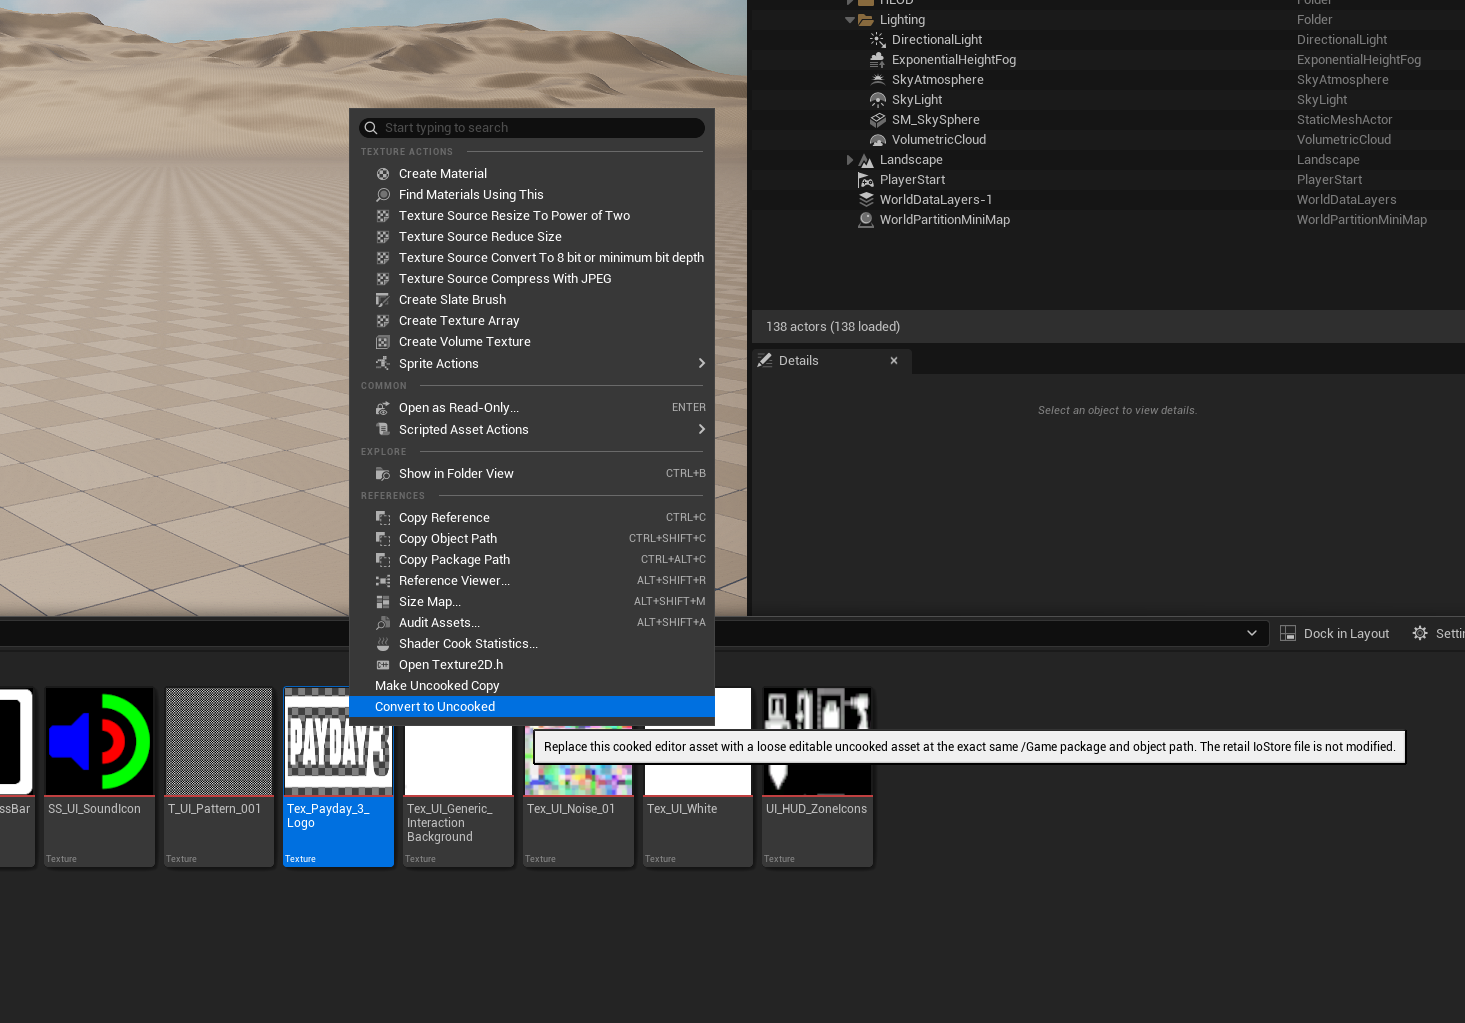
Convert to Uncooked creates an editable loose asset at the exact same /Game/… path. It replaces the mounted cooked representation inside the editor without modifying the retail game’s IoStore files.
|
Keep both textures at their original names and paths. For this direct replacement, use Convert to Uncooked and leave the resulting assets in Moving them into `MyFirstMod’s content directory or importing new textures there would give them different paths. The game needs the replacements at the paths it already uses for its logos. |
See Asset Replacements for the full conversion and replacement workflow.
Reimport your replacement artwork
Repeat these steps for each uncooked texture:
-
Double-click the uncooked texture in the Content Browser to open its texture editor.
-
Click Reimport and choose the image file you want to use as its replacement.
-
Check the texture preview to confirm that it now displays your artwork.
-
Save the texture.
Do this for both SS_UI_PD3_Logo_02 and Tex_Payday_3_Logo. Each texture should now preview the image you selected for it.
Reimporting updates the image data in the existing texture asset, keeping the asset name and path that the game references. If you revise the artwork later, reimport it again, save the texture, and Forge the mod again before testing.
Add both replacements to the mod’s PAL
The edited textures live under /Game/…, outside the mod plugin’s own content root. CrimeForge needs an explicit entry for each one to know that it belongs to MyFirstMod and must be included in the forged output.
Follow the Add the replacement to the PAL step for both textures:
-
Return to
MyFirstModin the CrimeForge manager and click its icon to open the mod’s content directory. -
Open
PAL_MyFirstMod. -
Find and expand Explicit Assets.
-
Add an array entry and use its asset picker to select the modified
SS_UI_PD3_Logo_02texture at/Game/UI/Textures/Generic/SS_UI_PD3_Logo_02. -
Add another entry and select the modified
Tex_Payday_3_Logotexture at/Game/UI/Textures/Generic/Tex_Payday_3_Logo. -
Save
PAL_MyFirstMod.
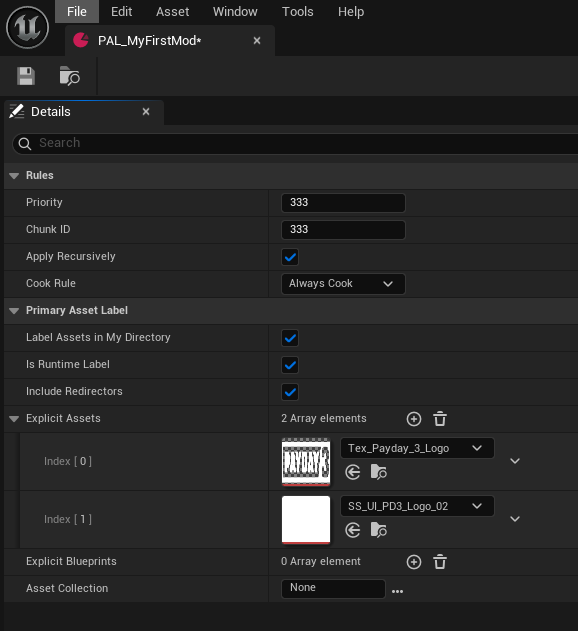
The PAL’s Explicit Assets list should include both:
/Game/UI/Textures/Generic/SS_UI_PD3_Logo_02
/Game/UI/Textures/Generic/Tex_Payday_3_Logo|
Saving the textures alone does not tell CrimeForge to include them. Both modified uncooked assets must be listed in `PAL_MyFirstMod’s Explicit Assets array. |
Check the PAL’s Chunk ID as well. It must avoid the game’s and DLC’s chunk IDs; a value greater than 100 is recommended. See PAL & Explicit Assets for the packaging settings.
Forge and install the mod
-
Save both textures and
PAL_MyFirstMod. -
Validate
MyFirstModin CrimeForge and resolve any blocking errors. -
Click FORGE on
MyFirstModand wait for a successful result. CrimeForge uses the PAL to include the external/Game/…replacements alongside the plugin content. -
If Copy Mods To Game is enabled in CrimeForge Project Settings, the successful Forge copies the mod to the game. Otherwise, copy the complete forged
MyFirstModfolder from the output location shown by CrimeForge intoPAYDAY3/Mods/.
The installed mod should be at PAYDAY3/Mods/MyFirstMod/, with its .uplugin file and all packaged content kept together.
The development plugin under <ModkitRoot>/Mods/ is your working source. Install the forged output into the game.
See Forge the Mod and Install and Test for more detail on packaging and installation.
Check the result in PAYDAY 3
-
Launch PAYDAY 3 with PDML installed.
-
Verify that PDML discovers and loads
MyFirstMod. -
Check the title screen: the PAYDAY 3 title logo should now display your replacement artwork.
-
Continue to the main menu and check its logo too.
Replacing both textures covers the title-screen and main-menu logos. You should see the images you reimported as soon as you reach those screens.
If a logo is still unchanged
Check that:
-
Both uncooked textures remain at the exact original
/Game/UI/Textures/Generic/paths with their original names. -
Each texture previews your replacement artwork and has been saved.
-
Both textures are listed in `PAL_MyFirstMod’s Explicit Assets, and the PAL has been saved.
-
You Forged again after the latest changes and installed the latest complete forged folder.
-
PDML loaded
MyFirstModwhen the game started.
If only one logo changed, check the other texture’s preview and PAL entry. After correcting anything, save, Forge again, update the installed mod, and restart PAYDAY 3.
Next: Forge the Mod.