Meshes
Meshes are 3D objects in the game, they can be separated into Static and Skeletal meshes each mesh type has its own purpose.
This section of documentation aims to give the user of the modkit some basic and necessary information for sucessful replacement of both the Static Mesh and Skeletal Mesh.
|
This part of documentation will expect you to have basic knowledge on how to use Blender and Fmodel. |
Before you start
If you have not yet, read through both the Fmodel setup page and the Cooked Assets page. After you read through those pages you can continue reading this page or if you are already familiar with PAYDAY 3 modding from the past and think you know what youre doing then feel free to skip reading those pages but it is highly encouraged to read through them anyway to make sure your knowledhe is up to date.
Find the model you want to replace
Locate the original cooked model in the Content Browser under /Game/….
Open the model in read-only mode first and inspect any defaults, references, materials, parent classes, or other information that may be useful when recreating the modified version.
Uncook the model
Theres no requirement to uncook the dependencies like the skeleton and the physical asset when it comes to Skeletal meshes.
|
While Some skeletal meshes do have |
Import the model into Blender
After you get the model exported from Fmodel you will open it in blender, for you to be able to open it in blender you will need to install this extention psk/pskx importer
General Rules in Blender
When it comes to general rules in blender most of them apply to the Skeletal Mesh but that doesnt mean that you can go haywire with static meshes
For Static meshes you will want to just keep your models size in check, if you wont you might end up causing unwanted clipping in the game when you will be testing your mod.
For skeletal meshes you will want to also keep the size in check but on top of that you will need to also setup naming of your model and the skeleton in blender correctly for it to transfer well when imporitng into the editor.
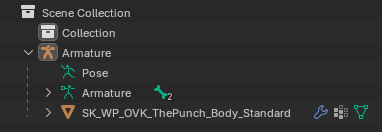
|
This is an example, your desired mesh name will be possibly different |
Export Settings
For exporting you will want to export your model as .fbx, theres not much difference between export settings for static meshes and for skeletal meshes but both settings setups are listed below.
Static mesh:
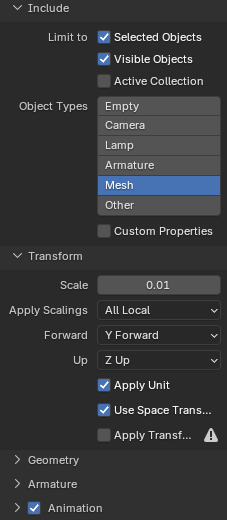
Skeletal mesh:
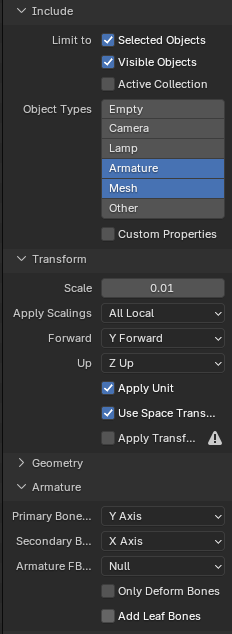
|
When exporting the mesh out of Blender make sure you have the mesh selected or when exporting skeletal mesh make sure both the skeleton and the mesh are selected. |
|
You can see that the only difference is including/excluding the armature and ticking off the |
When you Export your model as .fbx you will want to make sure its named the same way as it is in the game.
Importing the model into UE Editor
When importing your edited model into UE first drag and drop your .fbx into your mods folder (if you are importing a skeletal mesh make sure you also select the correct skeleton in the import settings)
|
Some meshes can have |
After that you will go back to where the original game asset is and delete it,
when deleting it there is a possibility that the project will ask you if you want to force delete or replace reference,
you will select the replace reference option and select your modded model, this will make sure the rest of your project doesnt possibly get messed up.
If the project wont give you this option you can simply delete the mesh.
From here you will take the mesh that is in your mods folder and move it to the folder where the original model was.
Your mod/PAL Setup
For your PAL setup you will want to include only the Static or Skeletal mesh, and keep the rest of the assets like materials, physical asset and textures in your mod folder.
|
Including the "Skeleton" in your PAL will most likely result in your mesh not loading or your game crashing when the game will try to render the mesh. |
General workflow
The general workflow for mesh replacement is:
-
Find the asset that you are looking for.
-
Uncook the model.
-
Get the model from Fmodel and import it into Blender.
-
Do your modifications to your model (adjust, edit, completely swap).
-
Make sure you configured the structure in blender right.
-
Export the model with proper settings depending on the mesh type.
-
Import and replace the uncooked asset with your model under the same name, if importing skeletal mesh make it refer to the proper skeleton.
-
Setup your PAL properly.
-
Package and test out your mod.