Materials & Textures
Materials control how something is rendered in Unreal Engine. While they are commonly used to define the appearance of meshes and how their surfaces respond to lighting, they are not limited to mesh materials.
Depending on the material domain and settings, materials can also be used for:
-
Mesh and surface materials
-
Decals
-
User interface elements
-
Post-processing effects
With the custom editor, you can create new materials and textures for use in PAYDAY 3 as long as the assets and features used by the material can be successfully cooked for the game.
This page focuses primarily on creating a basic surface material and material instance, but the same Material Editor is also used when creating materials for decals, UI, and post processing.
Before You Start
It is recommended to avoid touching pre-existing cooked materials that were from PAYDAY 3 originally due to their editor data being stripped, so you won’t get much use out of them. It is better to create your own master materials from scratch.
If you are also planning on distributing materials you have created, it is advised to NOT use Static Switch Parameter nodes, they can cause issues or crash users who are attempting to use them without the custom editor.
Creating a Master Material
To create a master material, go to the area of the Content Browser where you want to create it, right-click, and select Material under the Create Basic Asset section.
For this guide, name it MM_YourMatName. We will be working with both master materials and material instances, so using prefixes such as MM_ and MI_ helps keep them organized.
When the material opens, the available inputs depend on its current settings and Material Domain. A normal Surface material can expose inputs such as Base Color, Metallic, Specular, Roughness, Normal, and Ambient Occlusion.
The material settings are also where you configure properties such as Blend Mode, Two Sided rendering, and Material Domain.
For example, changing the Material Domain allows the same material system to be used for other purposes such as Deferred Decal, User Interface, or Post Process. The node graph and available outputs will change to match the selected domain.
This guide uses the default Surface domain and builds a simple Base Color/ORM/Normal material.
I won’t go into specifics on how to create a material that will suit your needs, since there are already plenty of tutorials out there, so I will be sticking with a basic Base Color/ORM/Normal Map formatted material for this.
If you would like official documentation of how to create materials, or get more in-depth explanations:
Official Epic Games Unreal Engine Documentation: https://dev.epicgames.com/documentation/unreal-engine/unreal-engine-5-5-documentation?application_version=5.5&lang=en-US
Adding Nodes
To add your own new node, right click anywhere on the grid and a popup of nodes will appear. You can use the search bar to find nodes that you need, and there are also a few hotkeys that you could use.
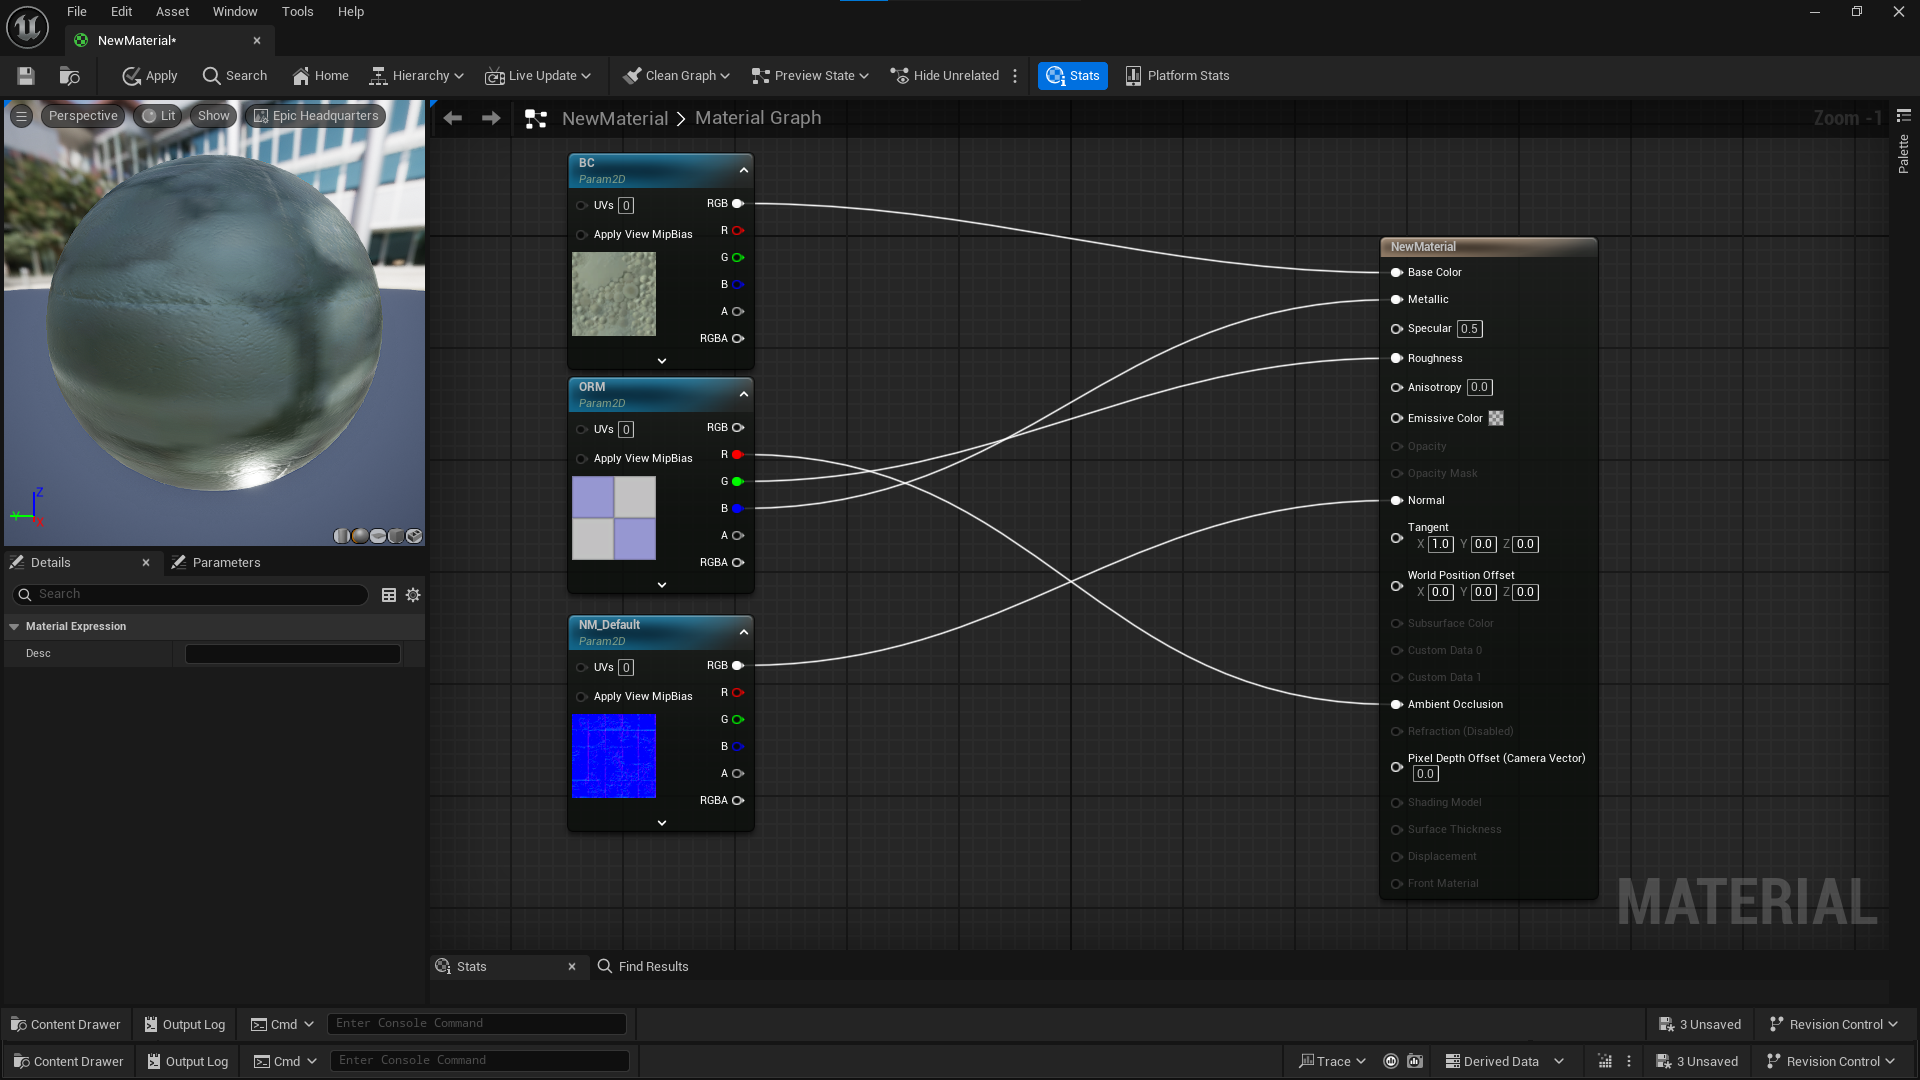
To start off with our basic Base Color, search for a TextureSampleParameter2D and connect the RGB pin to Base Color, this will allow for you to change the texture in a material instance, which will be brought up later. You can name the Parameter to anything you like, "BC" or "Base Color" would fit.
Now for the ORM texture, which is an abbreviation for Occlusion, Roughness, Metallic, this is a masking texture for which you can store 3 types of data in 1 texture, this type of texture is commonly found across many Unreal Engine games and is good practice for optimization and file size.
Copy and paste your texture, rename the parameter to ORM, and use the "DefaultDiffuse_TC_Masks" texture.
For this texture, the sampler type of this texture would need to be "Masks" for it to visually display correctly, not being able to do so would result in issues in displaying the texture.
Take the R channel and put it in the Ambient Occlusion node
Take the G channel and put it in the Roughness node
Take the B channel and put it in the Metallic node
Lastly, for your normal map, you can paste another texture node and call this new texture parameter NM, and replace the texture being used with a normal map from the engine editor resources. Then take the RGB output and put it in the Normal Input
Your final result of the material should look like this if you have followed all steps properly.
Emissive (Glowing) Textures
Emissive textures or vectors control if you want parts of your model to glow. This can be handy if your material makes use of an emissive texture to add extra detail. If you want to control the brightness of your emissive texture, you can add a scalar node and a multiply node, plug your texture or vector into the A slot of your multiply and your scalar into the B slot. Call your Scalar Node "Emissive Brightness" or something to refer to easily.
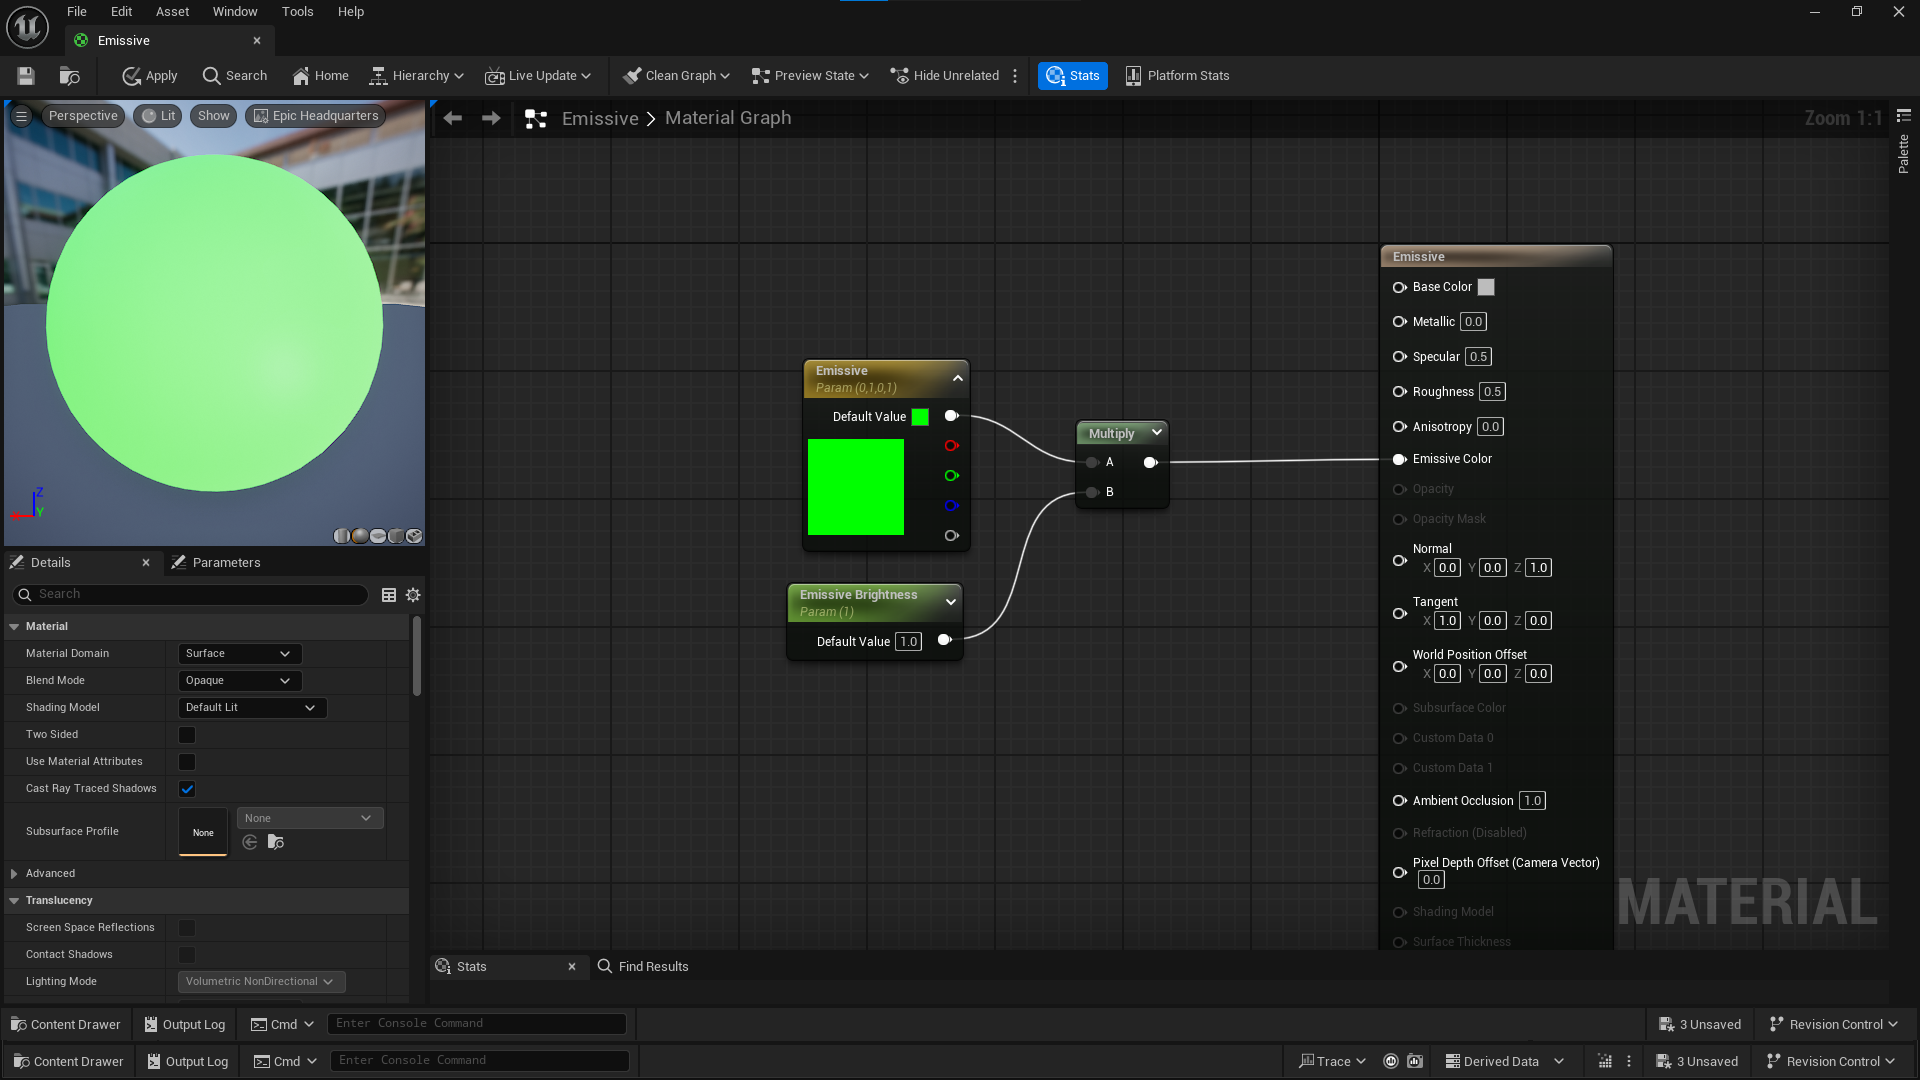
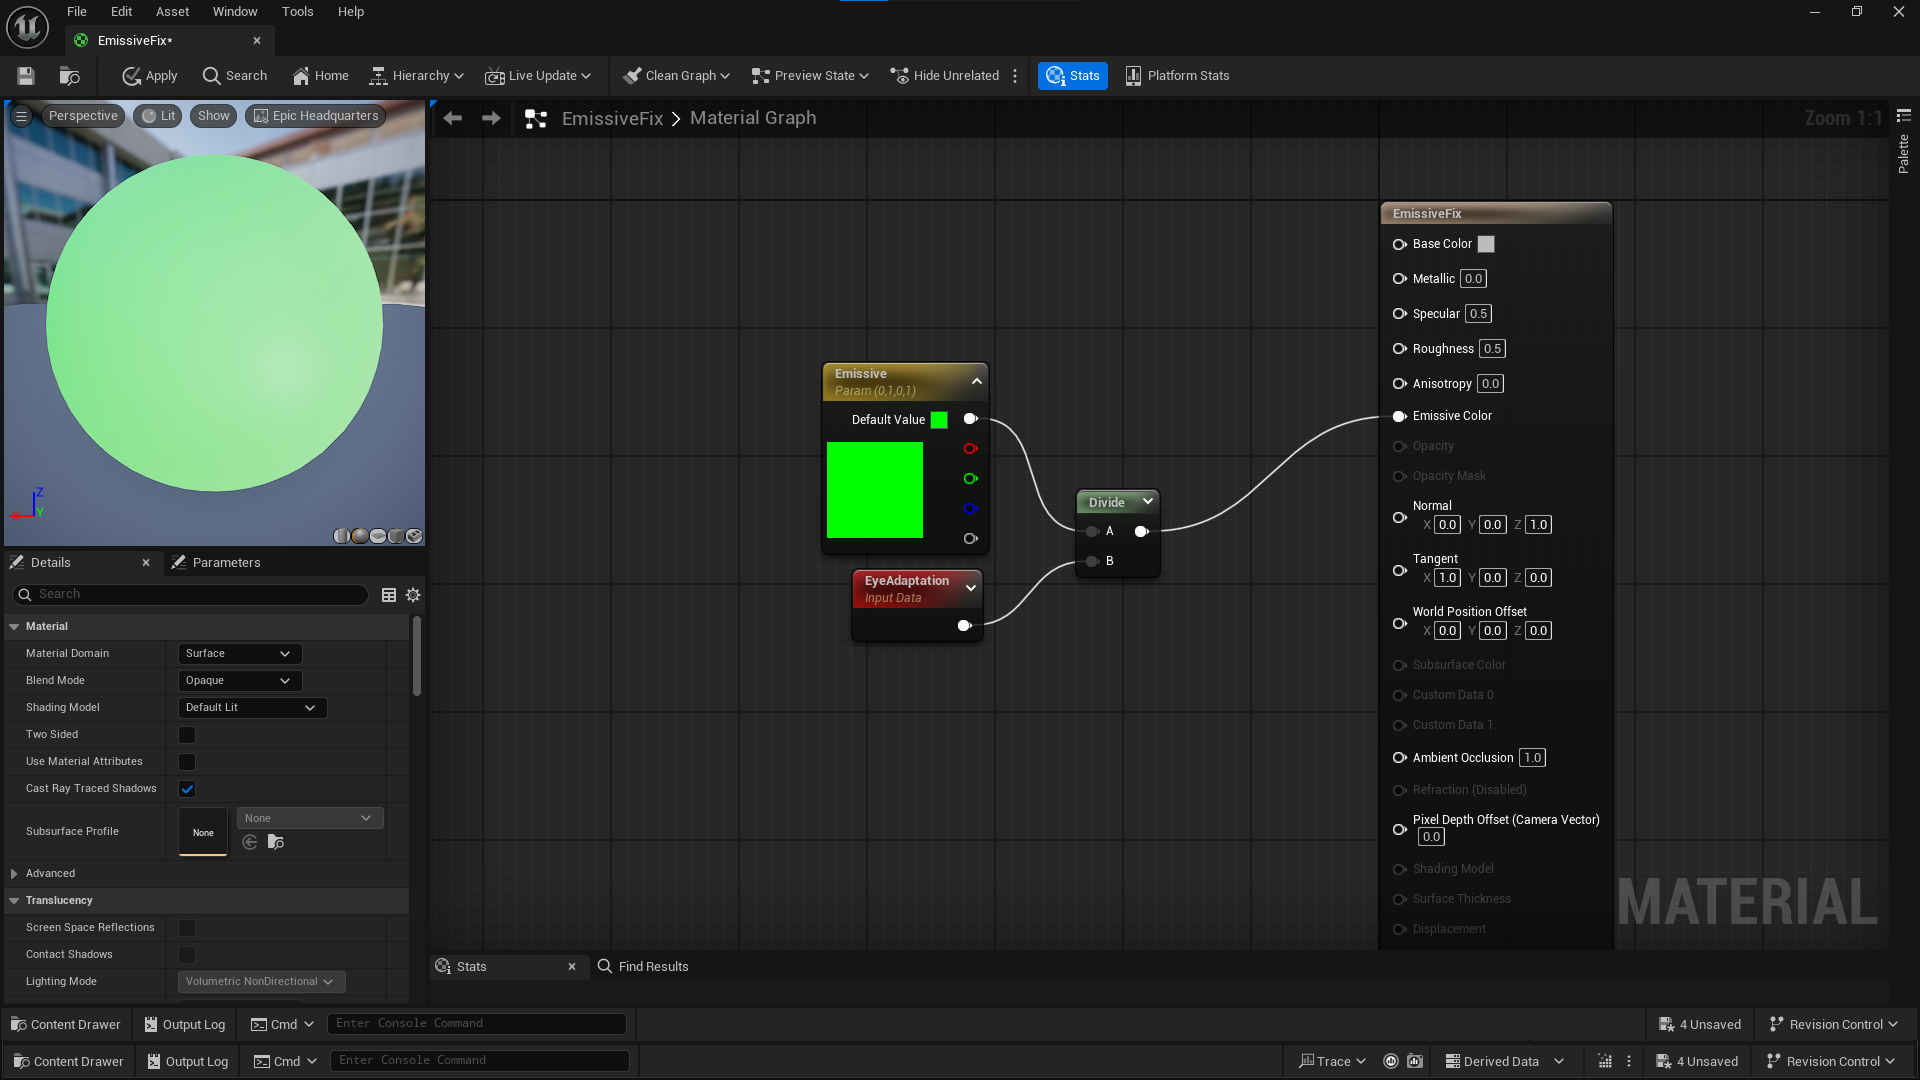
Emissive textures on some heists are displayed correctly, but could sometimes appear to be too dim or too bright in some other heists due to post processing of the heist or light exposure.
To fix this issue from happening, take the output of either your texture or multiply node and add a Divide node and plug it into the A slot. Get an EyeAdapation node and plug it into the B slot of the divide, then plug the output of the divide into Emissive Color, and this will resolve your issue of inconsistent emissive brightness on certain maps.
Opacity Masking Textures
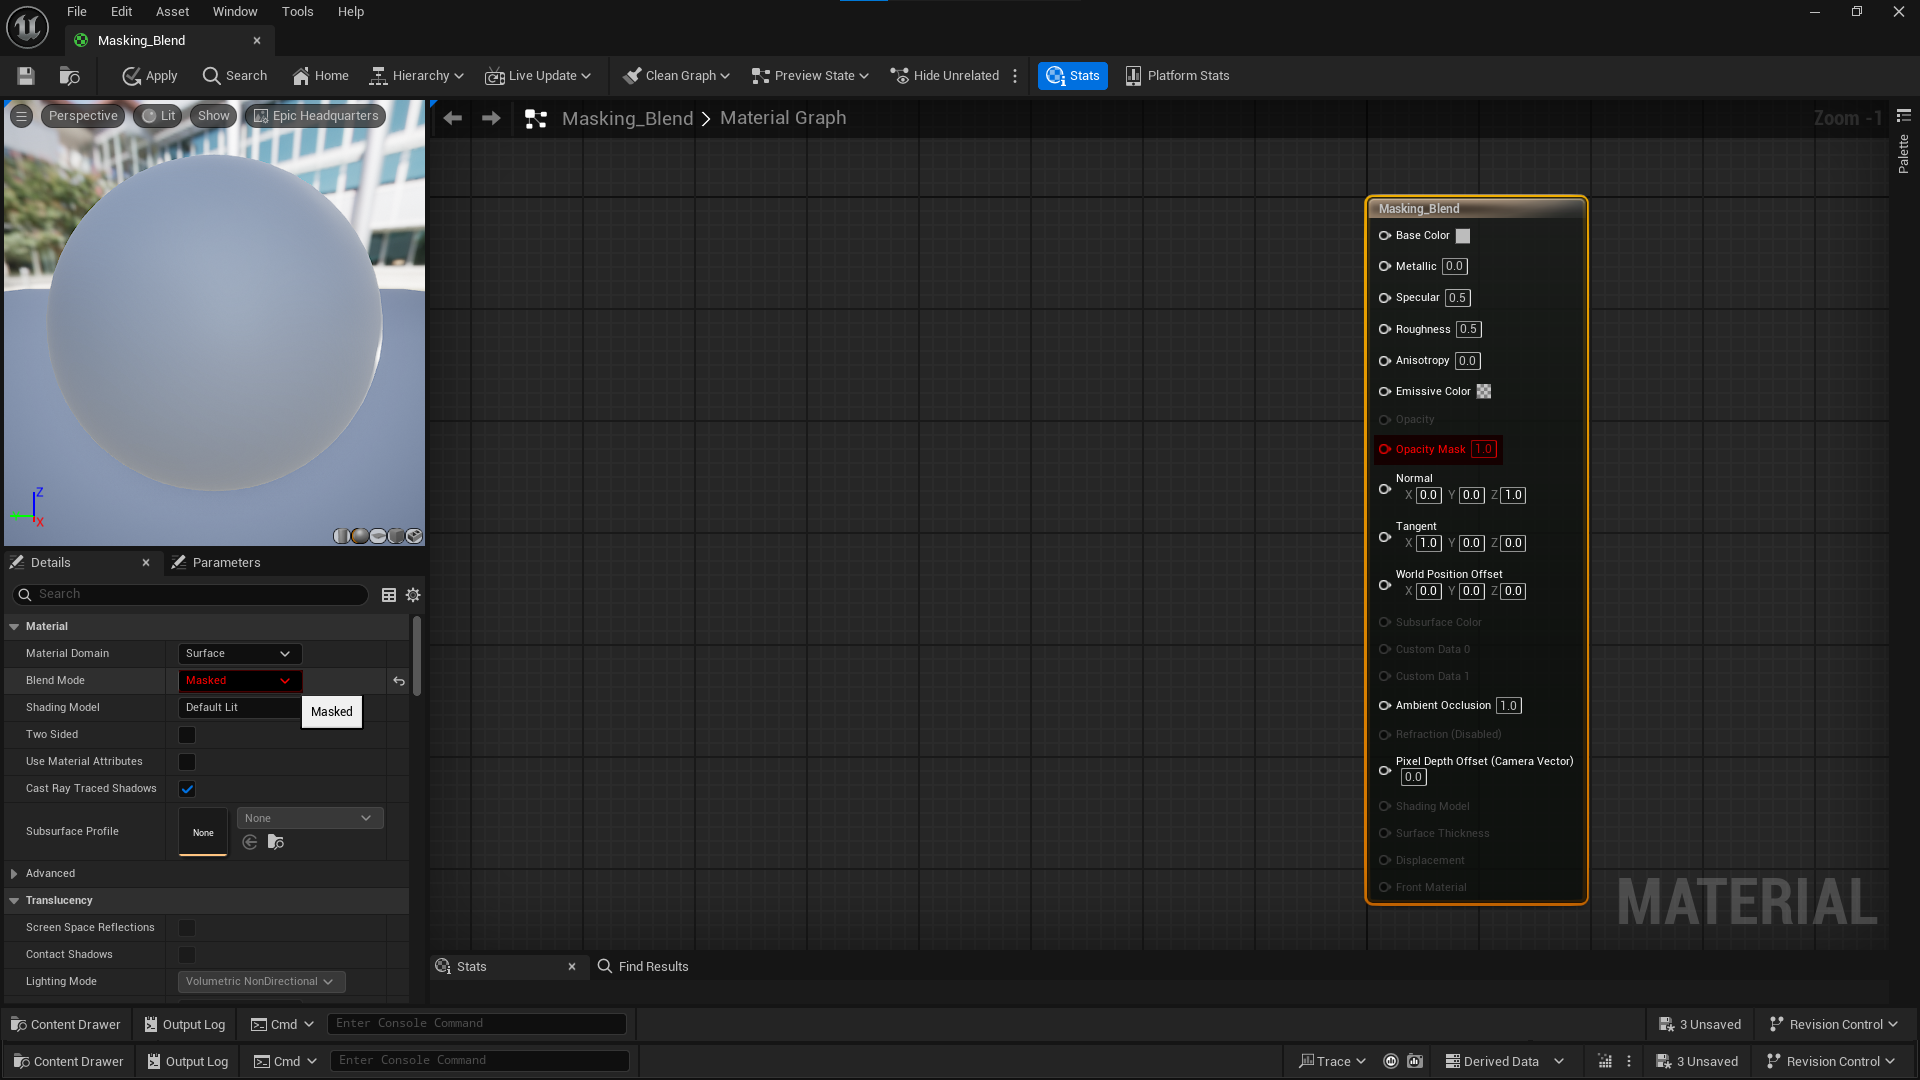
Opacity textures are commonly used on textures that require opacity, like hair or glass. To properly use a opacity texture, set your blend mode of your material to "Masked" or "Translucent" but I do no recommended using a translucent blend unless you know how to use one properly. It is also good practice to have your opacity be combined with either your Base Color or ORM texture packed in the alpha channel to avoid calling extra textures.
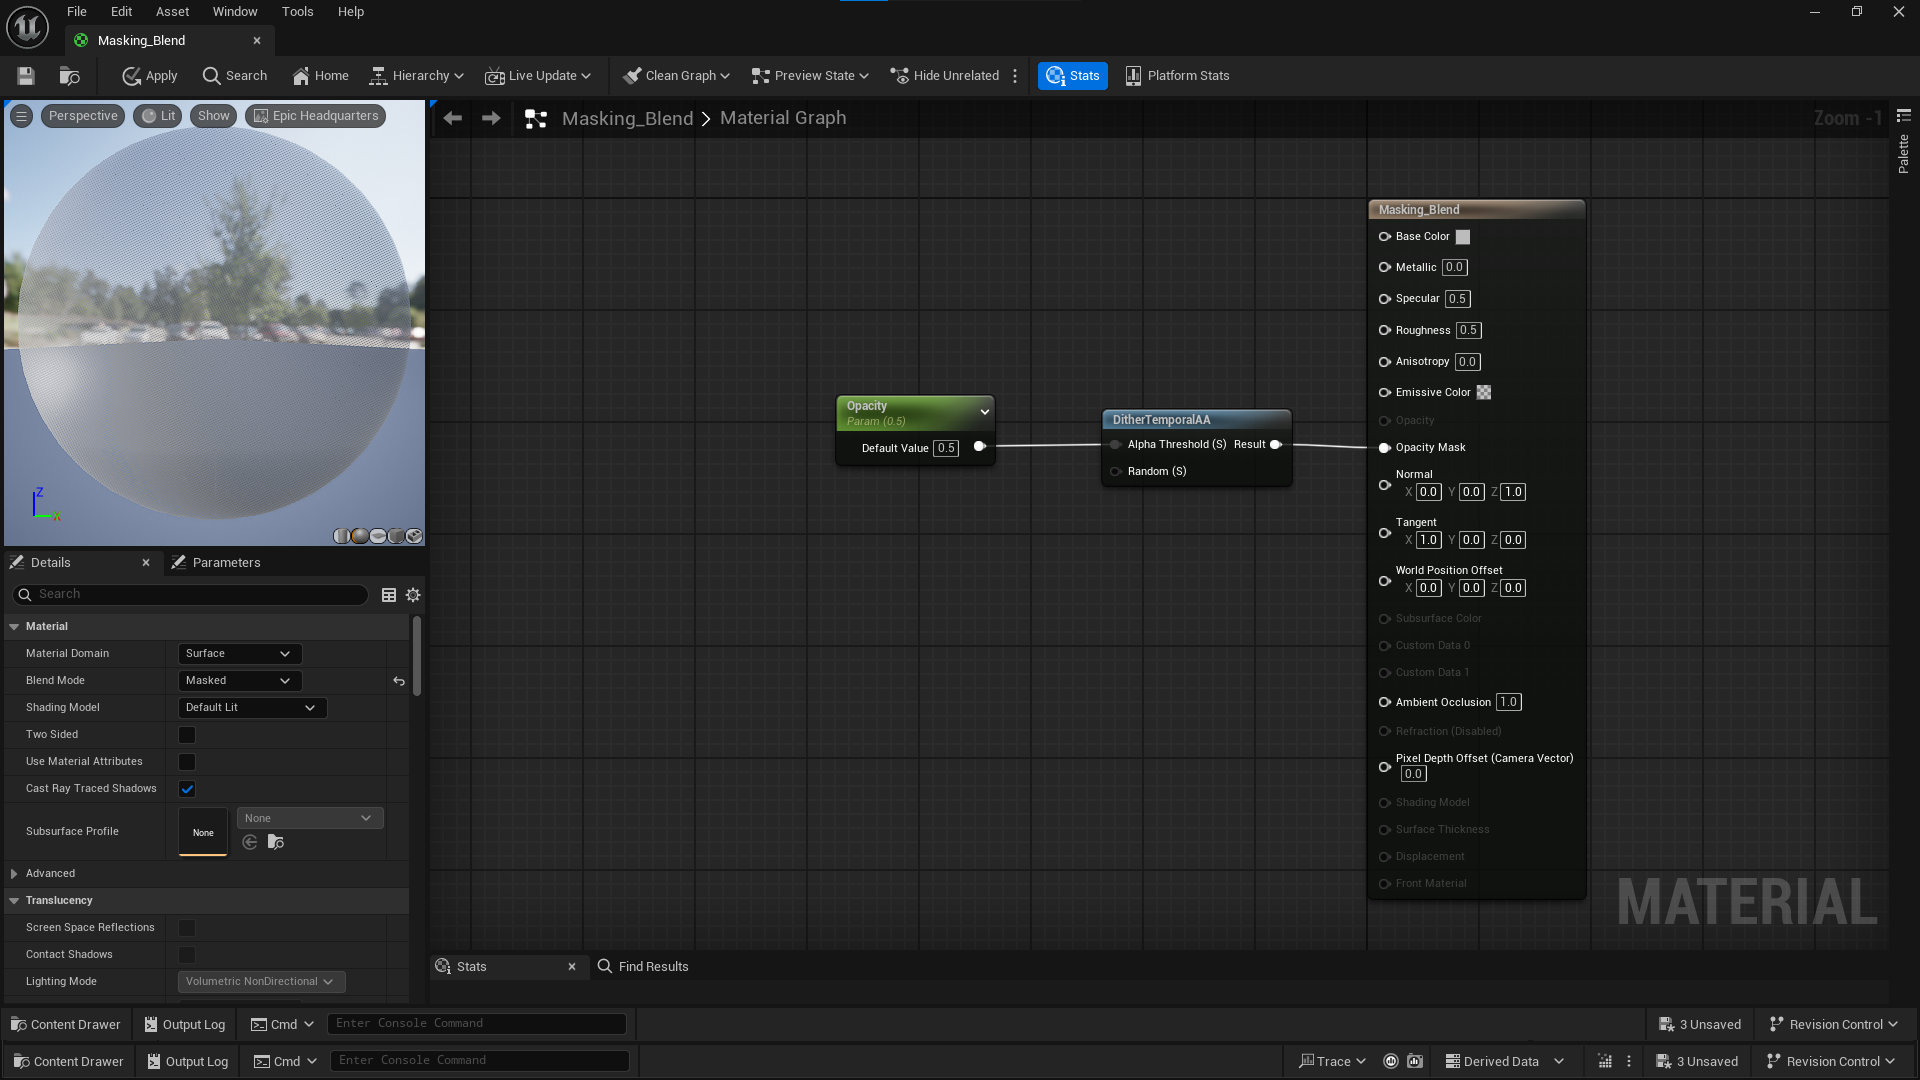
Though using a masked blend technique is less resource costly, the output of the opacity could be unsatisfying. Opacity usually in this format works in a 0 or 1 value, where a part of the texture is either visible or invisible. But if you want to mimic the use of using a translucent blend mode without needing to use the extra shader work to use one, you can use a "DitherTemporalAA" node which will act like a psuedo translucent material for your material. Simply plug in your Scalar or opacity texture into the Alpha Threshold (S) input and your Result into the Opacity Mask node. You can add an extra scalar parameter to the Random (S) input, but it is recommended to either keep it alone if you do not want to use it.
Starbreeze Formatted Normal Map Textures
A normal map texture is what mimics fake 3D bumps and lighting on a model to give it extra detail. Many modern models use them, whether it would be for the model as a whole, or overlaying multiple patterns over. But I will explain how you can create your normal map the Starbreeze way.
Starbreeze has formatted their normal in a rather unusual way, instead of going the traditional way of having a XYZ channel, they opted to only use a XY channel and replaced the Z height with a roughness channel, and packed in a metallic in the alpha, this normal map format is seen on the MM_HelicopterInterior that many users have used before custom master materials have become a thing.
If you would like to recreate it in favor of using it instead of a normal XYZ, here are the steps to do so:
-
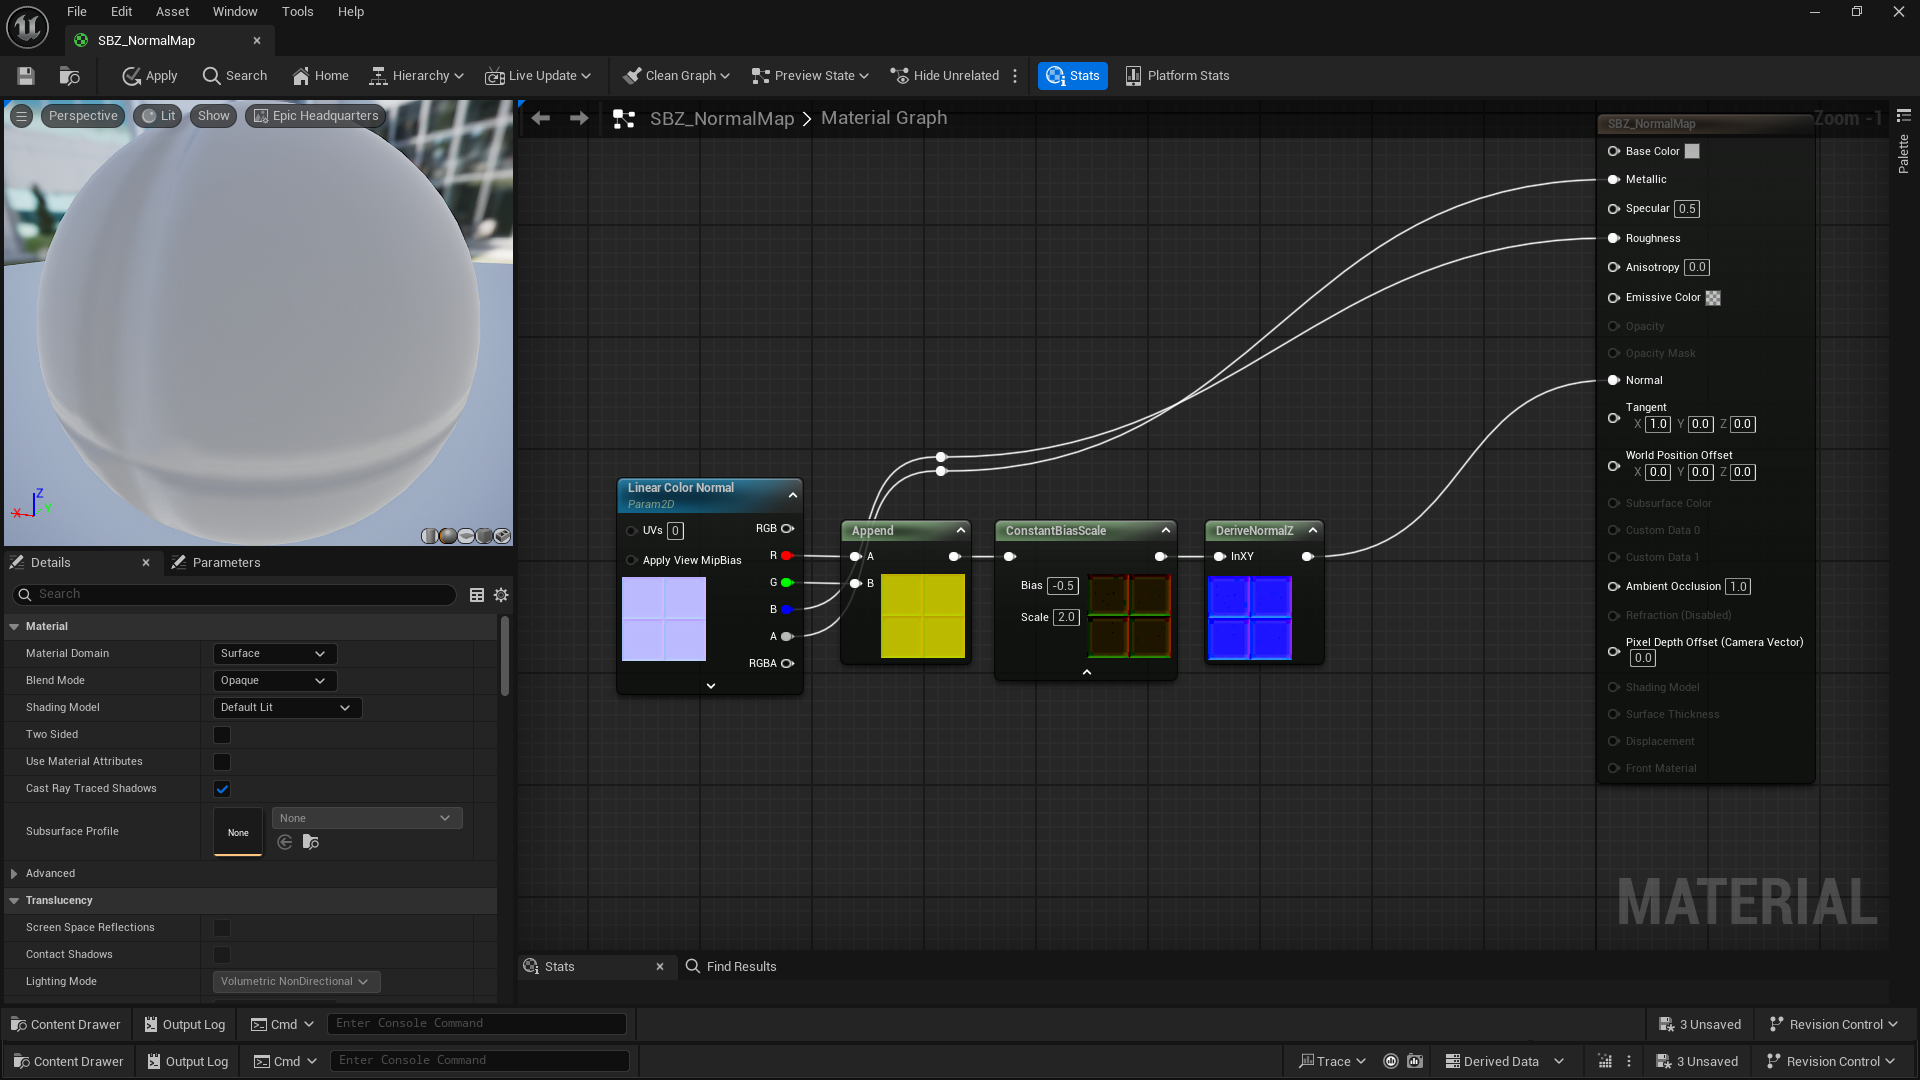
In your master material, instead of using a normal map texture, you want to use a Linear Color Normal Map. Regular normal maps do not support alpha channels, and are not compatible with having other texture masks in their channels.
-
Add an AppendVector and connect your XY (RG) color masks to the A and B slot.
-
Connect the AppendVector output to a ConstantBiasScale, make the Bias have a value of -0.5, and the Scale 2.0
-
Connect the output of the ConstantBiasScale to a DeriveNormalZ and connect that final node to your Normal slot.
Your final output should look similar to this:
|
With the DeriveNormalZ, this will reconstruct the Z height of the normal map using the X and Y channels, so you are not losing much detail if you use this format of normal maps. This setup is almost the same to the Linear Color formatted normal as it will be explained at the bottom of this document, but with the exception of there being a Roughness and Metallic channel instead of a Z height channel. |
Node Shortcuts
These are some of the shortcuts I use frequently, but there are plenty more.
M + Left Click - Multiply Node

A + Left Click - Add Node

I + Left Click - If Node

S + Left Click - Scalar Parameter Node

O + Left Click - Invert (1-x) Node

1 + Left Click - Constant Node

4 + Left Click - Constant 4Vector Node

T + Left Click - Texture Node

C - Comment
Creating a Material Instance
Once you are done tinkering with your Master Material, it is now time to create your Material Instance. A Material Instance is basically your original Master Material, but you are able to freely change scalars and paremeters/textures to what you want it to be.
To create a Material Instance, right click on your Master Material and in the "Material Actions" tab, select "Create Material Instance".
By default, Unreal Engine will call this Material Instance whatever your Master Material was, but ending in "_Inst"
If you want to rename it, name it "MI_YourMatInstName"
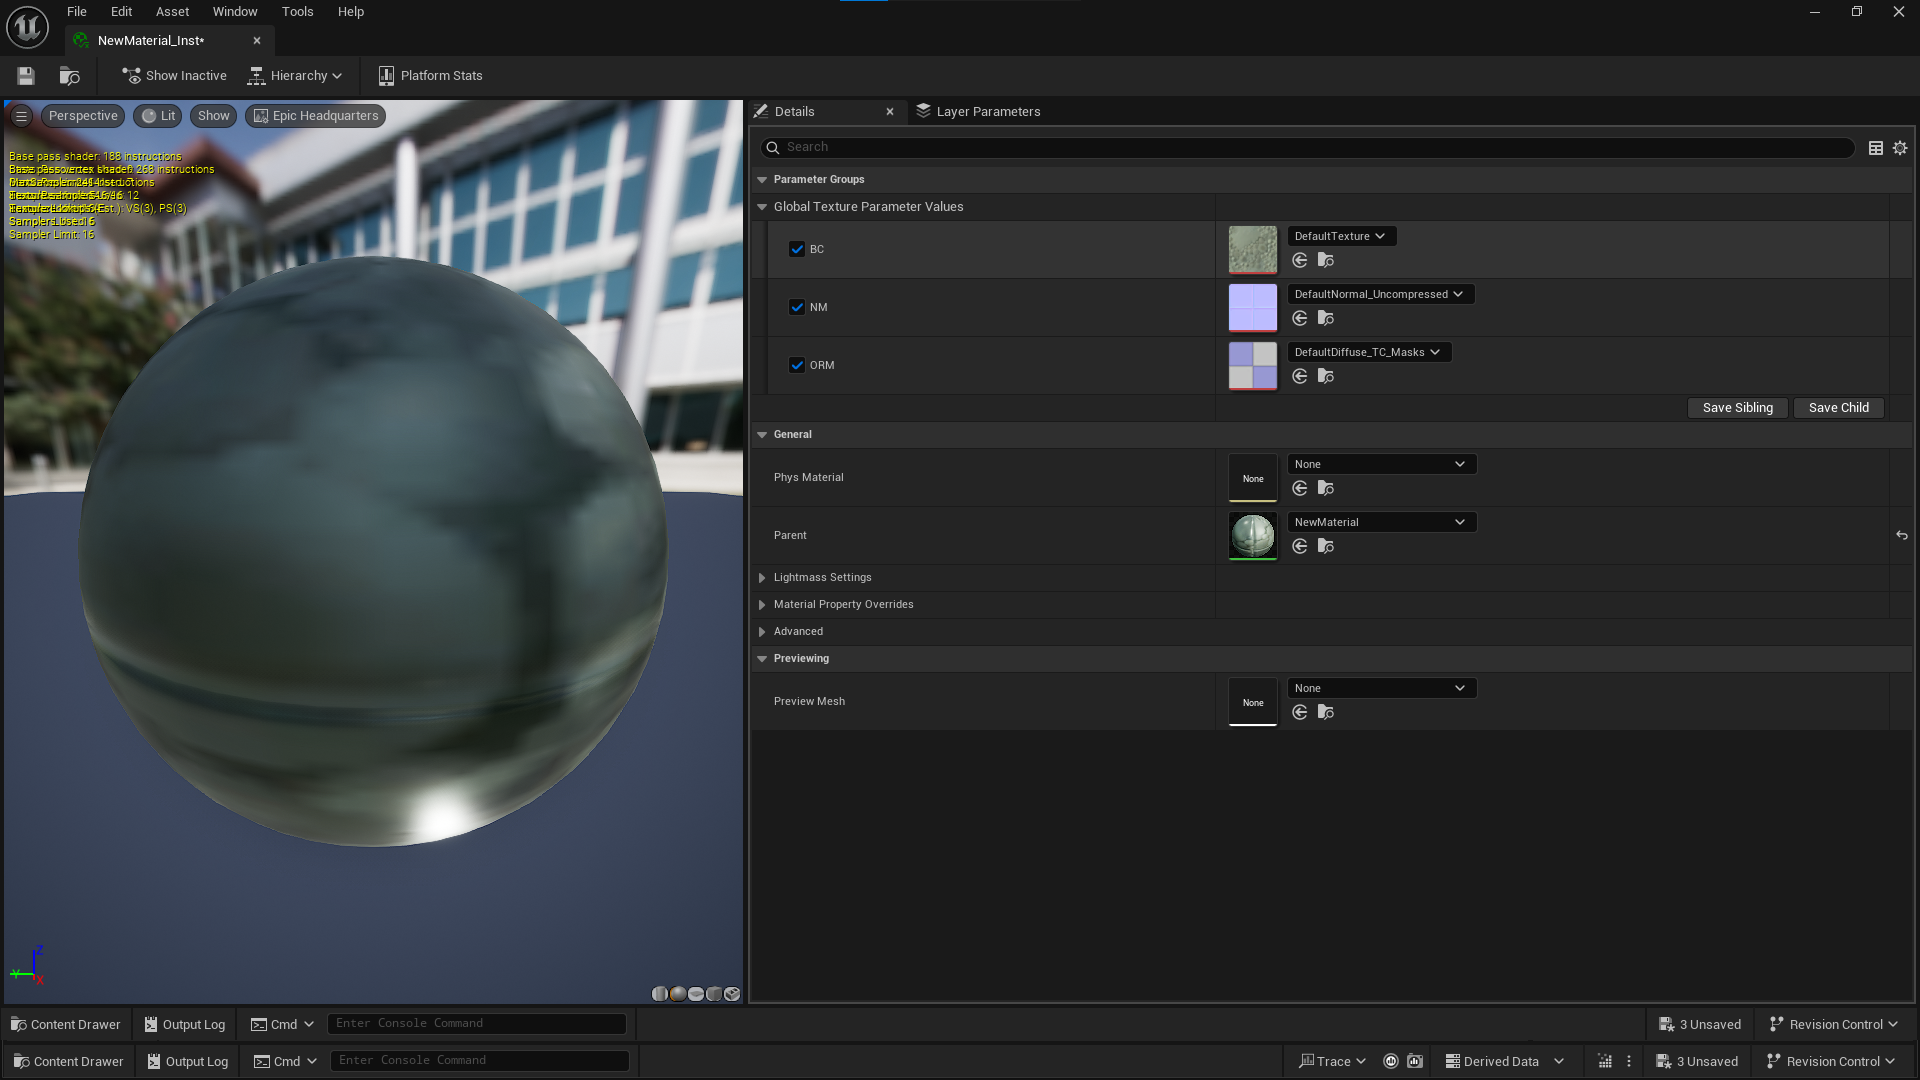
In the Material Instance screen, you can drag and drop your textures over the appropriate parameter, and save.
Importing Textures
There are plenty of different textures you can import, ranging from texture sheets to UI textures or stickers.
Base Color textures should be imported with "BC7 (RGBA)"
Masking textures, like an ORM texture for example, it is advised to set the compression to "BC7 (RGBA)" and unticking the "sRGB" box.
For normal maps, set compression to "NormalMap (BC5)" and unticking the "sRGB" box.
|
"NormalMap (BC5)" can cause channel artifacts, so if you instead want to use BC7 for better quality, set the texture’s sampler type to Linear Color, plug the RGB node into a "ConstantBiasScale" make the Bias value -0.5, and your Scale value 2.0, then plug into a normalize node. 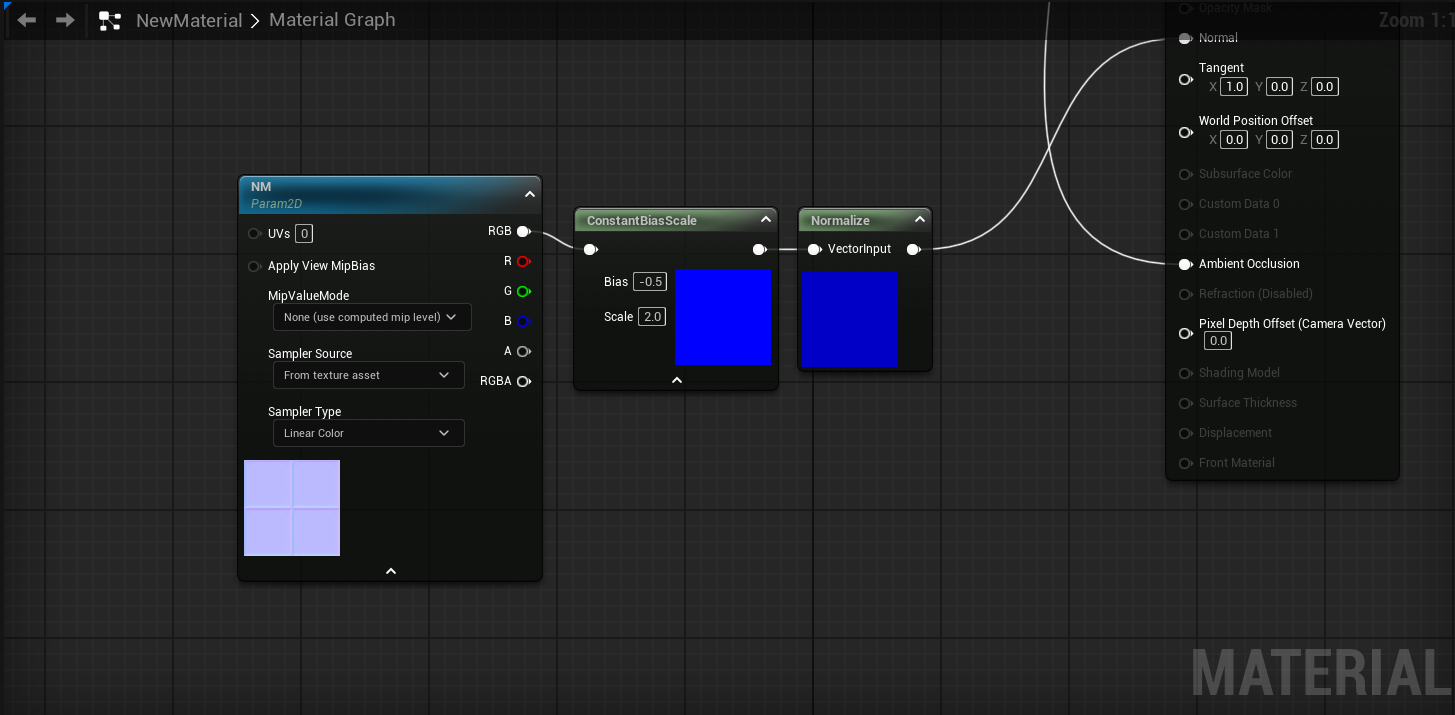
If your Normal Map is also formatted in OpenGL (Y+) you can use the "Flip Green Channel" setting to convert it to a DirectX Normal Map. |
UI textures should be imported with "UserInterface2D (RGBA8)" And also in the Mip Gen Details change the setting "FromTextureGroup" to "NoMipMaps" it is generally not advisable to have texture streaming on your UI element texture as it could get lowered with texture quality, which you do not want.
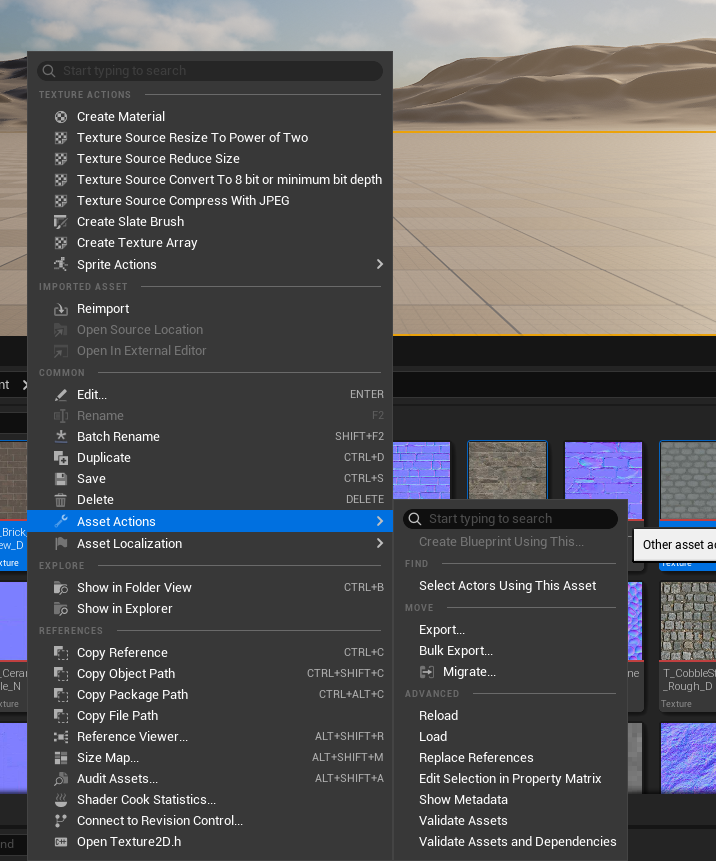
If you’re porting a model or adding a collection of new textures you can select each texture, right click and hover over "Asset Actions" and in the second menu that appears, select "Edit Selection in Property Matrix" this can allow you to mass edit textures instead of needing to do it all one by one, which can be a huge time saver.